¶ Portable Wii U
I'm a sucker for nostalgia. The Wii U may have been Nintendo's biggest failure during my lifetime, but I think it was my favorite console growing up. Some claim the “U” in “Wii U” meant “you”, as the console's tablet like gamepad added more focus on the individual player as opposed to the original Wii's focus on playing together (hence “Wii” sounds like “We”). I personally think the “U” stands for “Upgraded”. The Wii U keeps most of the functionality of the original Wii, and adds some nice features like native HDMI output and a second semi-portable gamepad screen that can be used in place of a TV if one isn't available.
I like many other die-hard Nintendo fans also grew up playing the Nintendo Switch. Unlike the Wii U, the switch is fully portable. And I couldn't help but notice that the form factor of the switch looked awfully similar to that of the Wii U gamepad.
[insert comparison image here]
So I thought, how hard could it be to make the Wii U gamepad fully portable like the switch? And thus the idea Portable Wii U was born.
The concept was originally very simple. If I could somehow power the Wii U console hidden inside a backpack, then I could play games on the Wii U gamepad anywhere just like the switch as the Wii U gamepad often just mirrors the TV screen. In researching how to do so, I encountered many other people who had successfully managed to do that with a plug-and-play setup that could be made by purchasing a usb c powerbank and a usb c to wii u cable (more on this later).
But when I thought about it, half the fun of a Wii U is its unique library of games that utilize both the TV and gamepad. And although a battery powered Wii U in a backpack would make the gamepad portable, some of my favorite games like Nintendoland that also need the TV would be unplayable. And thus I resolved that this portable Wii U would also need to have a screen as well. So I looked through my spare parts, found a screen, and started to scheme up how to fit the screen, Wii U, and batteries in a nice portable package.
I used OnShape to design a case for all the electronics that could be made from laser cut wood held together by 3D printed parts. You can view the design in OnShape with this link. Here are some photos of it.
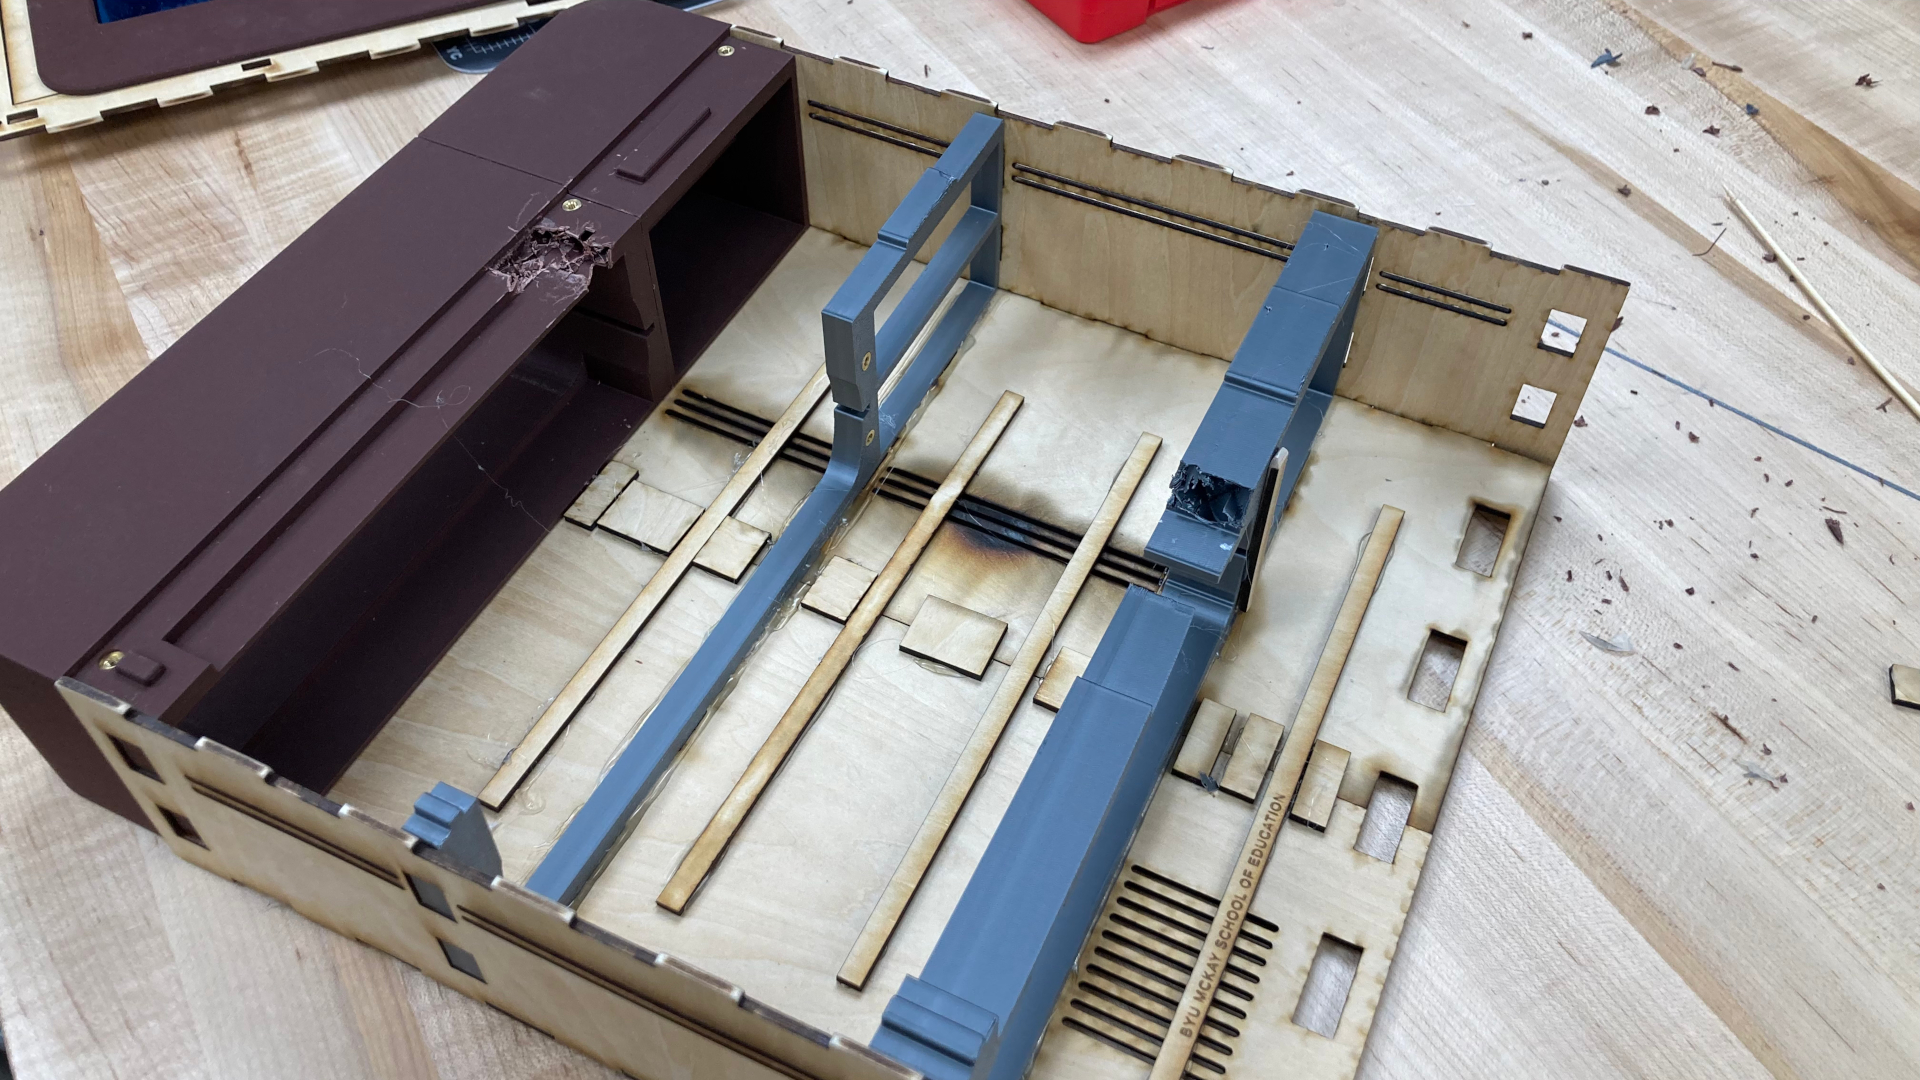
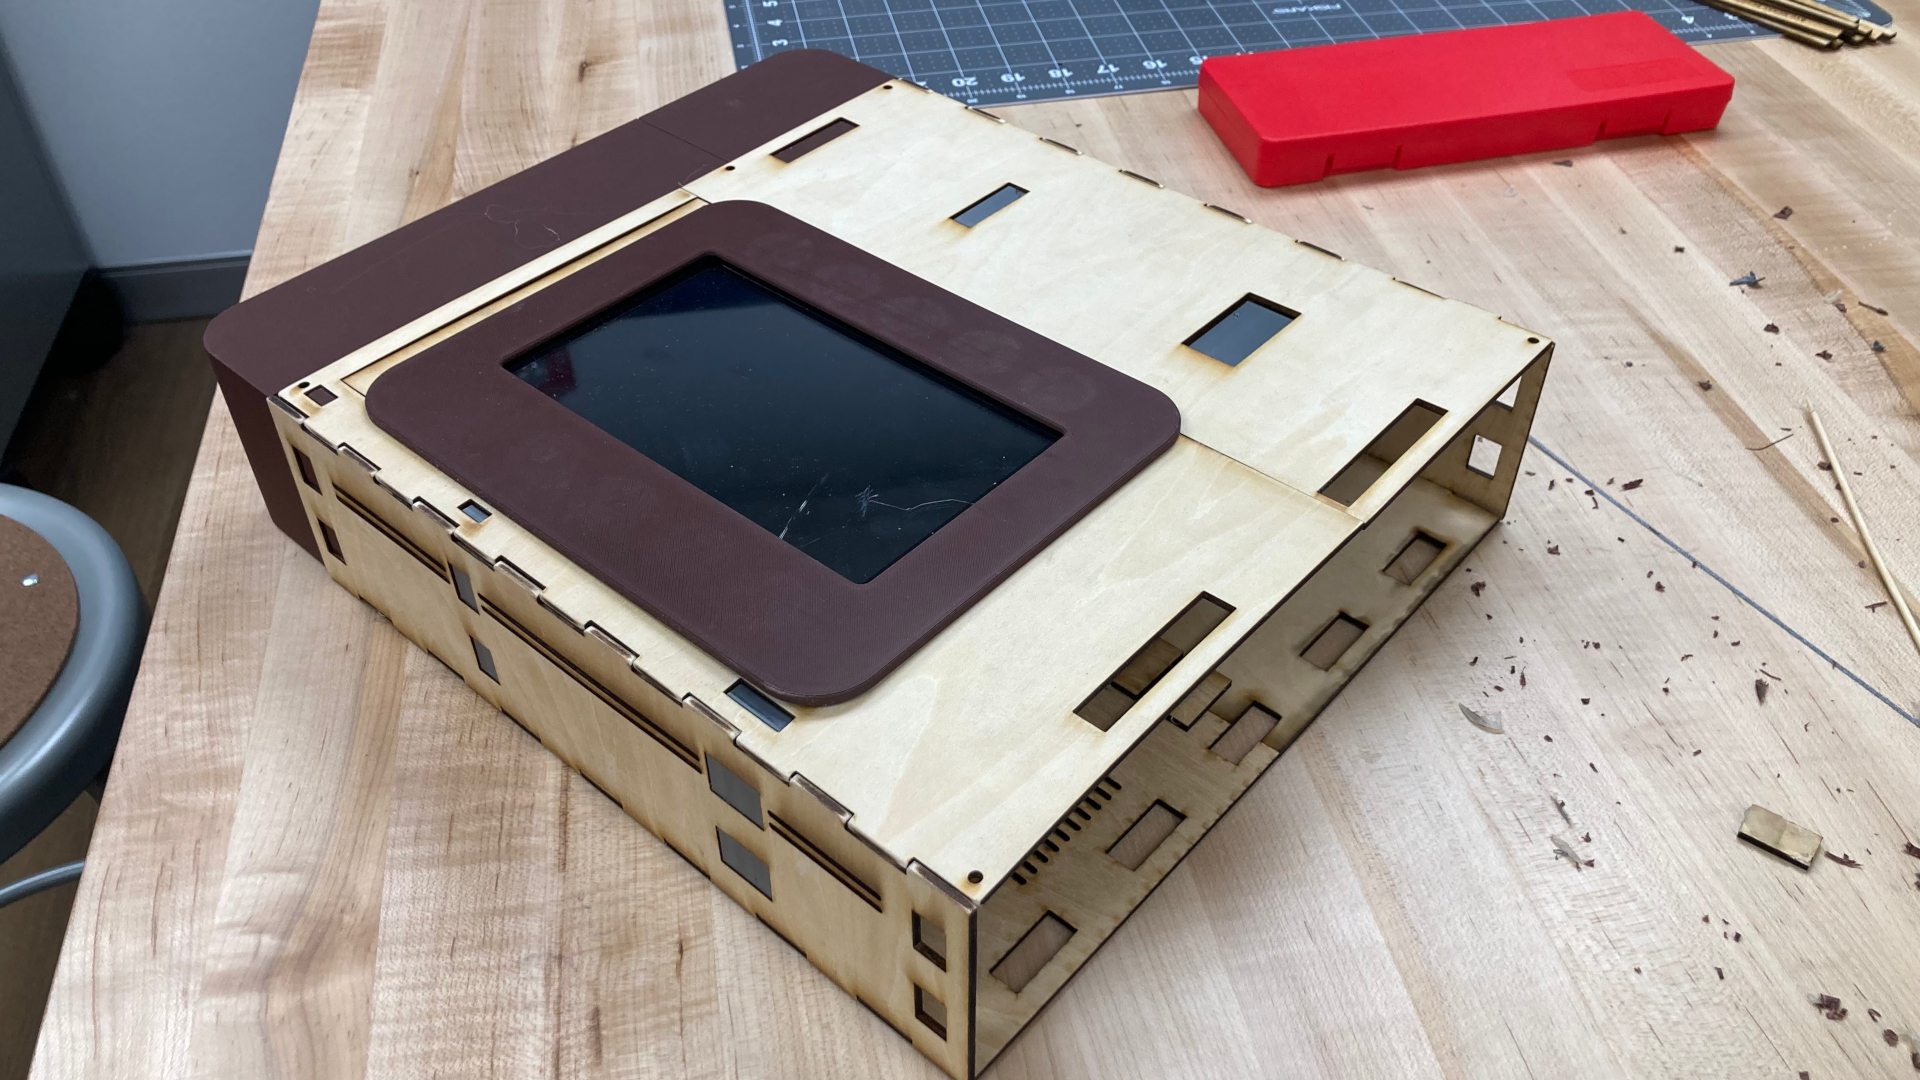
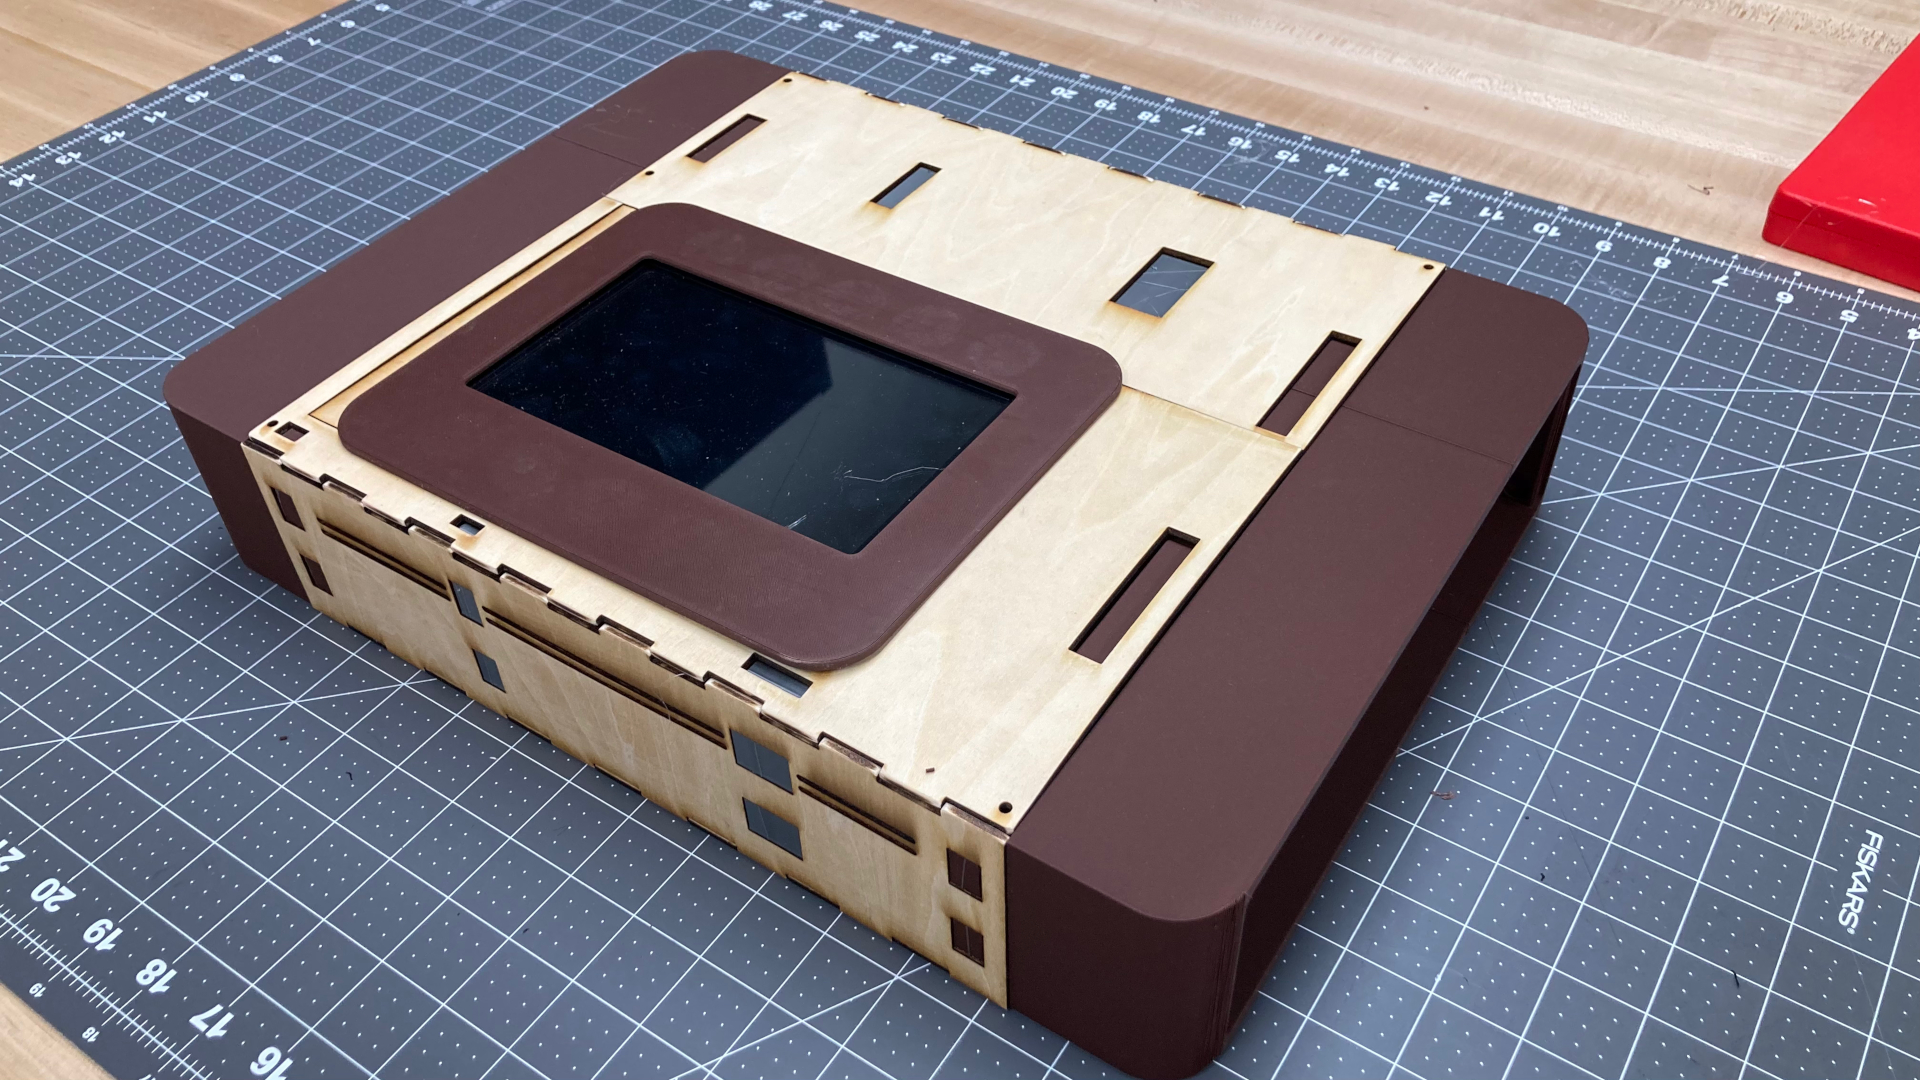
The prototype was very sturdy, and all the parts fit very well inside of it. However, the screen stopped working, and I found it to be much too small. Additionally, I made the internal space much larger than necessary not knowing how much space I would actually need for cable management. I found it unsatisfying, so I searched for another screen on amazon and tested a new setup.
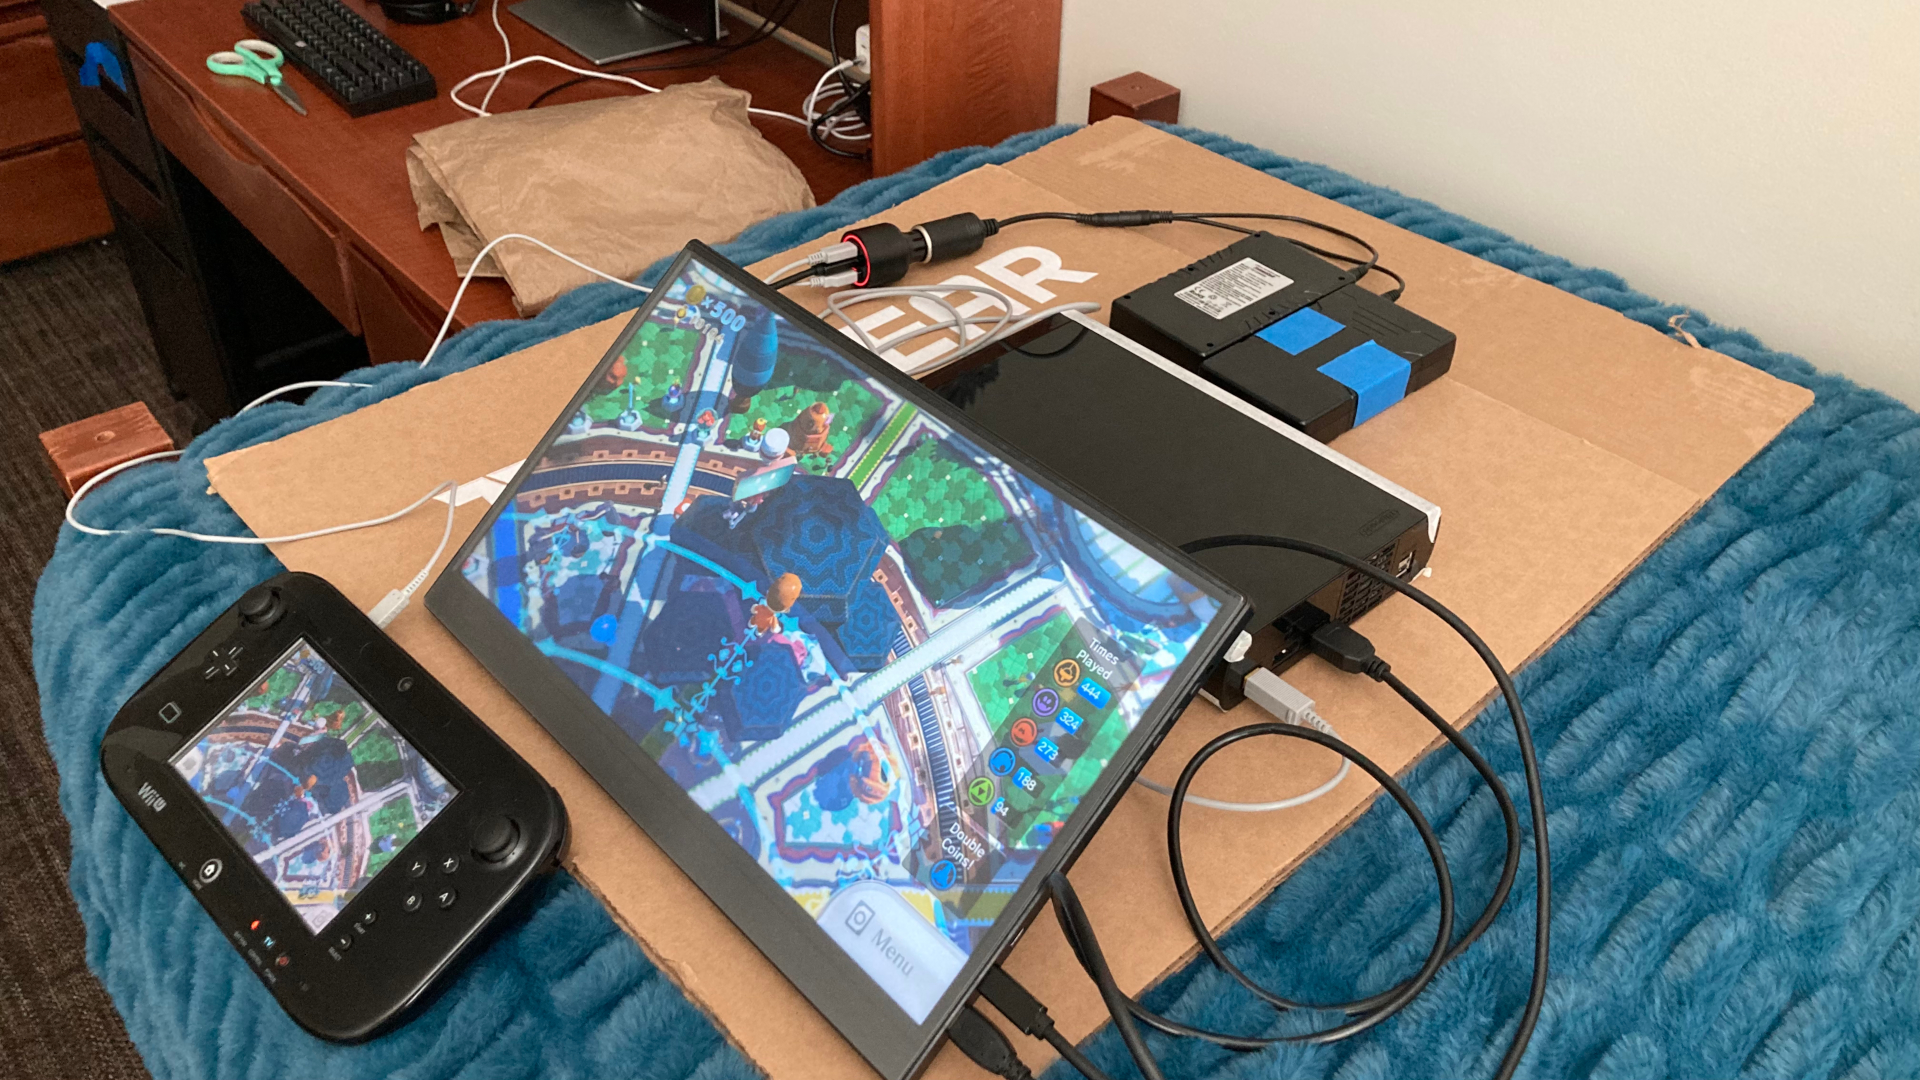
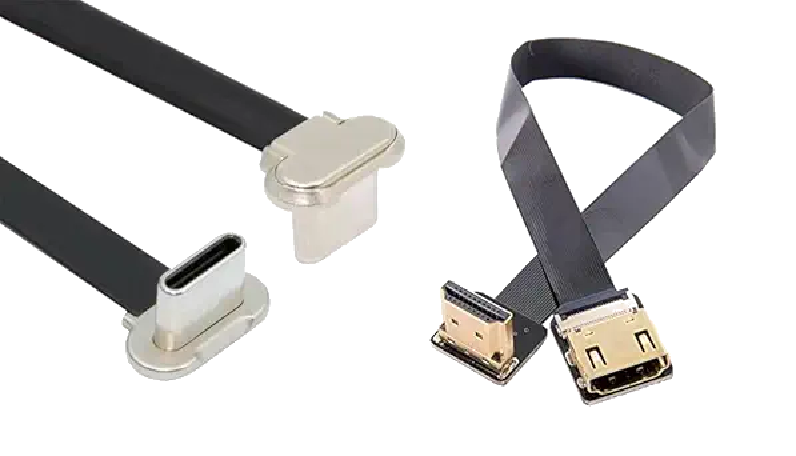
This new setup with a larger screen worked quite well, and looked like it could be packed in a small enough footprint that it could fit inside of a backpack. I also realized that the cables used in this setup were much longer and bulkier than needed, so I found some shorter and thinner cables on amazon to help cut down on space.
I began designing the second version in OnShape, and also realized it was missing some other nice features like a sensor bar for wii remote pointing, or charging ports and power switches that can be accessed without opening up the box containing all the electronics. I put many hours into designing portable Wii U v2 but ultimately never fabricated it, partially because I observed some issues, and partially because some ideas for improvement came to me that would require redesigning it entirely. In the end, this is what v2 looked like in OnShape:
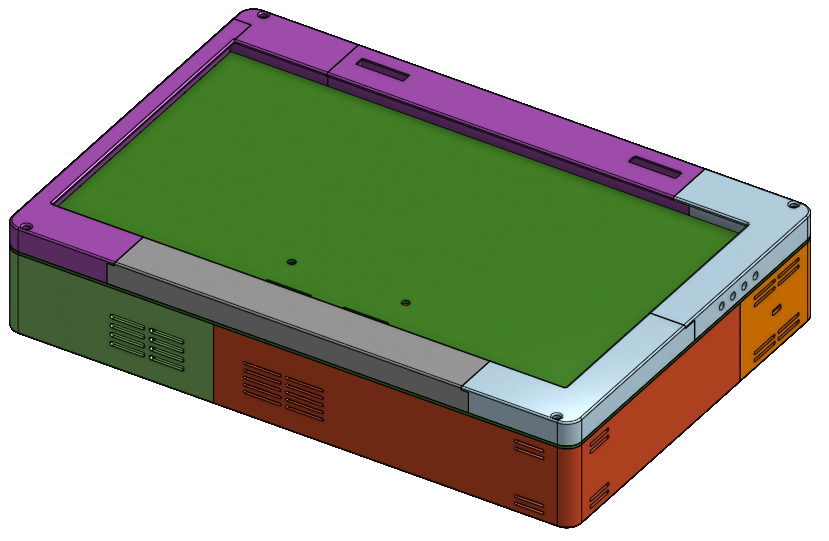
This design can be viewed here if you wish to see more of the internal details.
Ultimately I scrapped v2 because it was likely going to be too large to fit in my backpack. So for v3, I attempted to reduce the footprint to be roughly the same size as my laptop, only much thicker. During this process, I also realized many of the electronic components could have casing or shells removed to make them smaller. For example, removing the shells around the power banks I was using as batteries removed more then 10 mm from the overall dimension of the batteries.
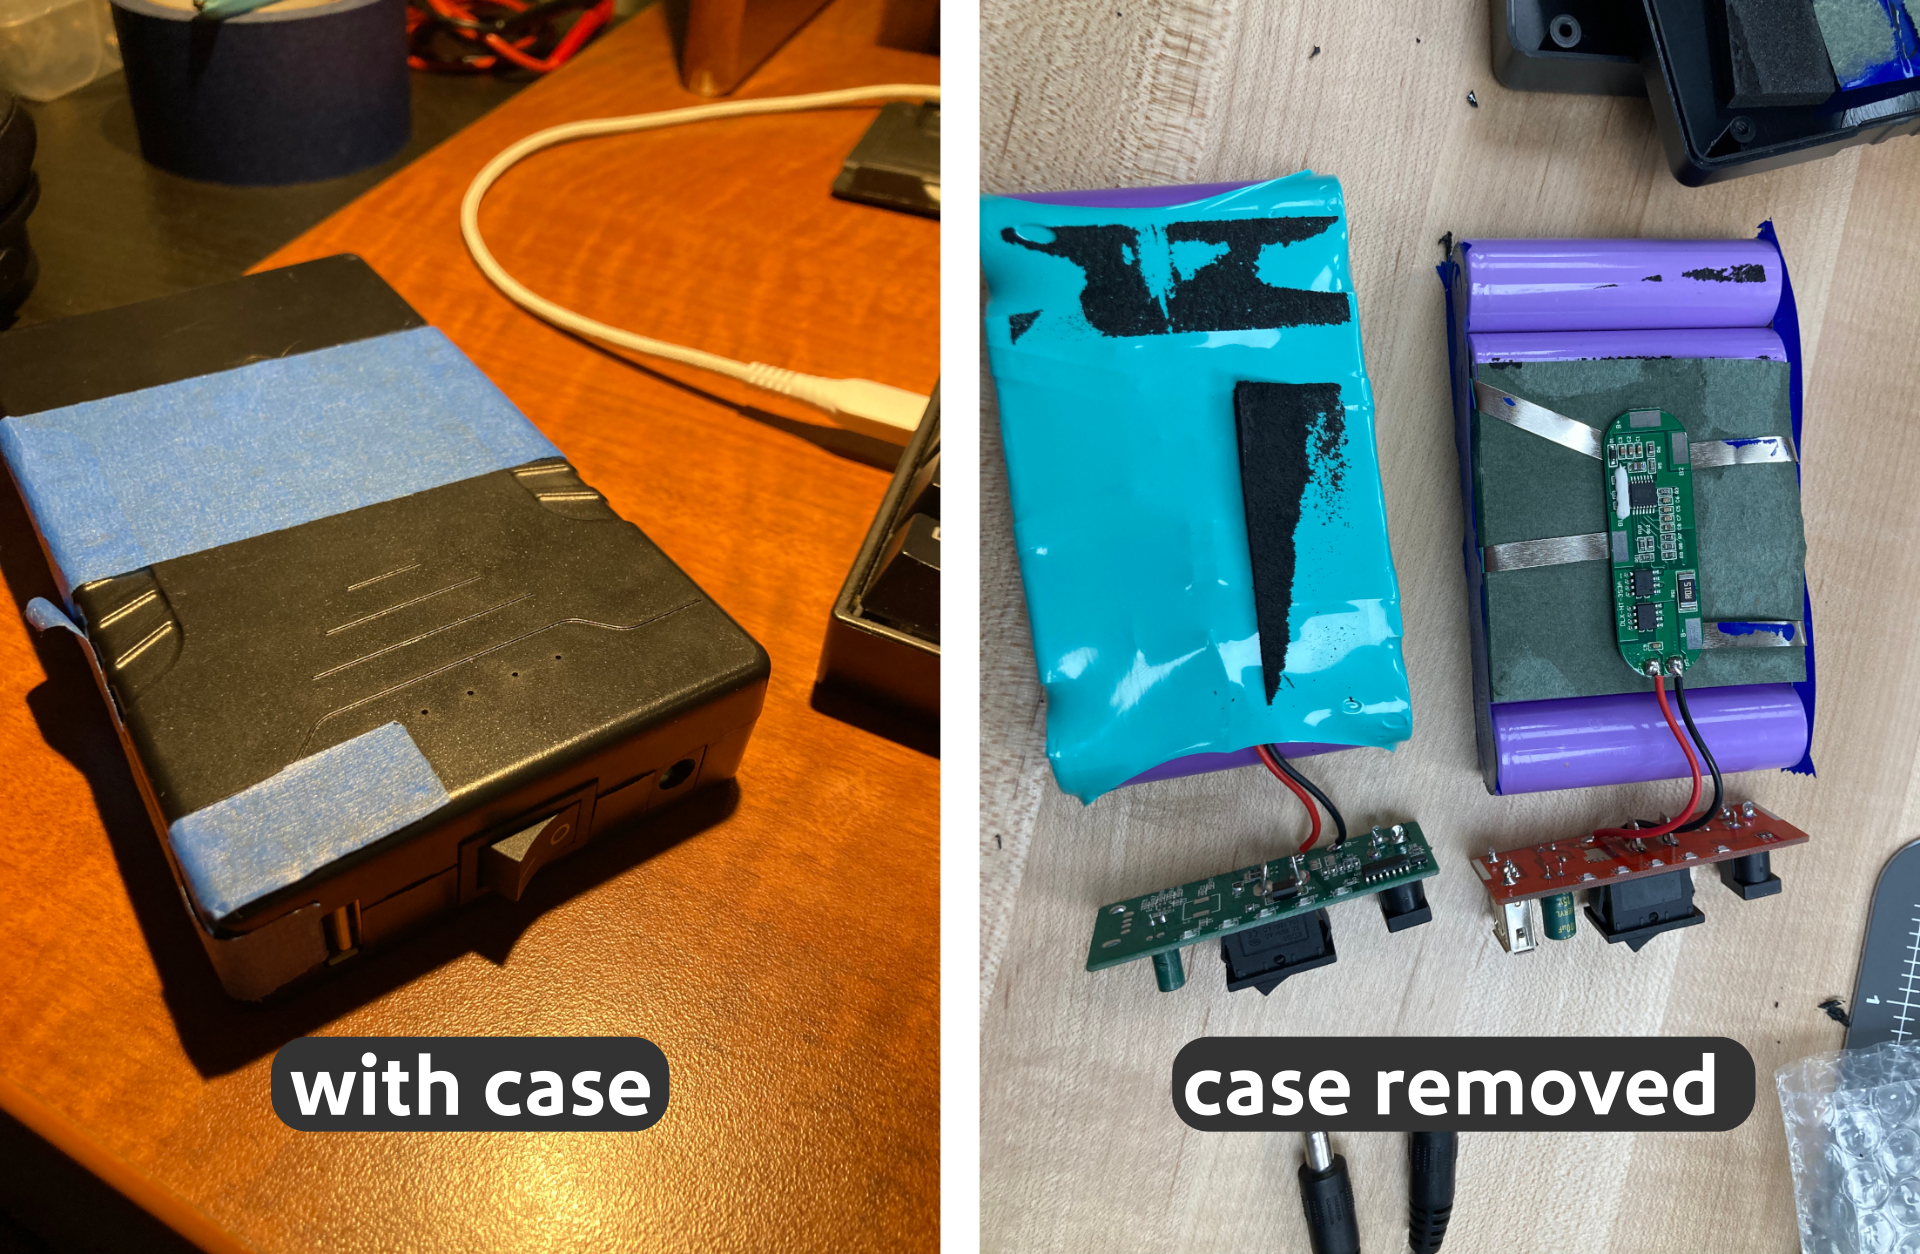
Similarly, the screen module of the portable monitor I was using as a display was removable from its plastic casing, also saving several millimeters. Removing casing from components also allowed me to solder wires to them, rather than having to use bulky cables or connectors to connect them to each other.
I also felt v3 needed an upgrade to its audio system. While the portable monitor I used for the screen had built in speakers, they were not very loud. Additionally, I wanted to add the ability to connect bluetooth headphones. So I made space inside the case to mount speakers, a small amplifier, and a bluetooth transmitter.
With the first prototype, I felt the Wii U didn't fit inside it very well. So I tried to get some better measurements to secure the console and make the body of the case tighter fit to the console. I also liked the filleted design of the sides of the Wii U, so I made the outer walls of the case roughly match that same curve.
[insert comparison of wii u that shows curves and the portable wii U curves]
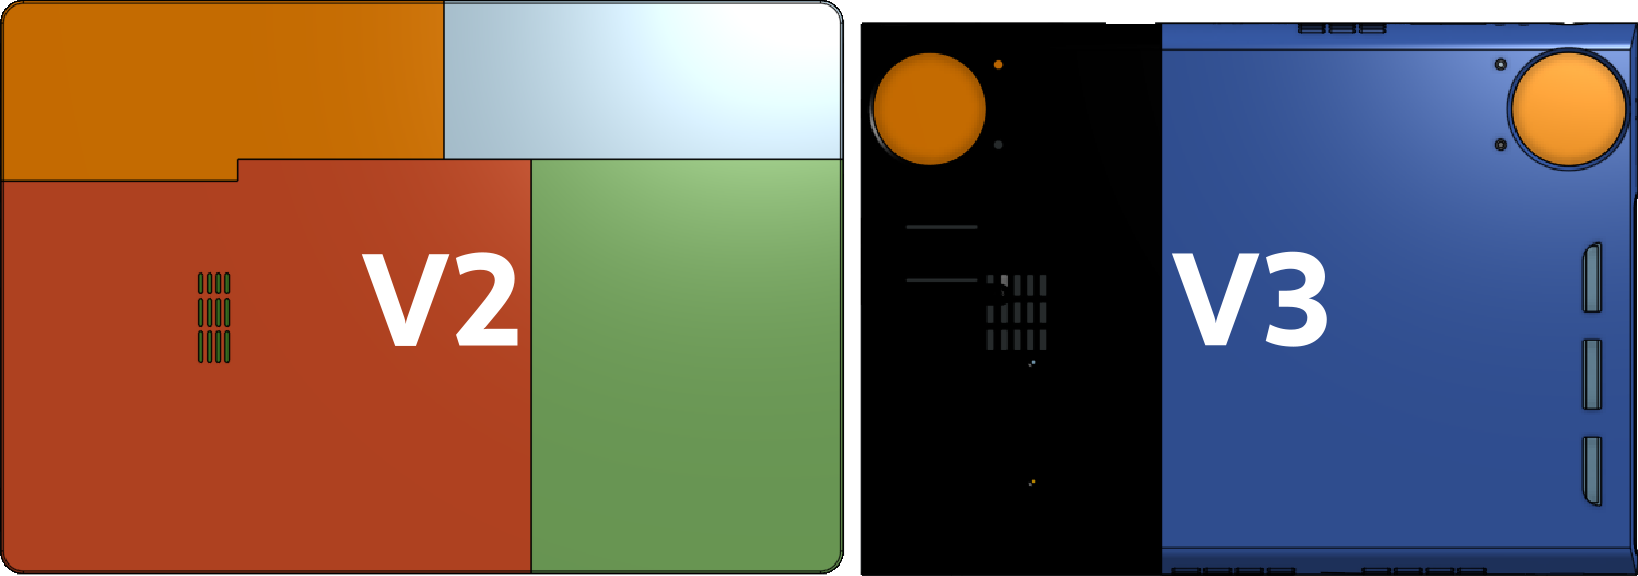
Both prior prototypes were also too large to 3D print in one piece on a standard sized 3D printer of 255 x 255 mm. I attempted to remedy this by making the case in multiple pieces with connectors, but found it added several unneeded millimeters to the overall dimensions. For v2, it almost created the problem it was trying to solve as removing the split and connectors on the short side may have made it small enough to fit anyways. On v3 it was consolidated to just two halves as the short side could just barely fit. See image below (isn't exactly to scale but fairly close).
Originally I designed v3 in one piece thinking I might be able to access a 3D printer with a larger print area. There are a few on BYU campus, but when I looked at a price estimate, I wasn't interested in paying 4 times the actual materials cost based off my rough calculations. So I stuck with the normal sized printers in the McKay School Toolbox where I work that I can basically use for free.
This of course meant I had to split v3 but I didn't have any space for any connecting interface. It also wouldn't have very much surface area for glue. But I read about a technique called PLA welding. I attempted to weld the parts with some scrap filament and a soldering iron, and it worked surprisingly well. My sloppy job didn't look the cleanest, but it made the two parts feel like one.
The OnShape files for v3 can be viewed here
The design also had several holes in it to add threaded inserts for M3 screws, which I was able to insert by putting them on the tip of a soldering iron so the plastic would melt around the inserts and hold them in place. These inserts were used as mounting points for many of the components and smaller 3D printed parts designed to hold everything in place. I did not dimension some of the parts very well, so there were a few instances where I had to drill or clip plastic off of parts to make them fit. But for the most part, physically mounting the parts was fairly easy, and all that remained was the electronics.
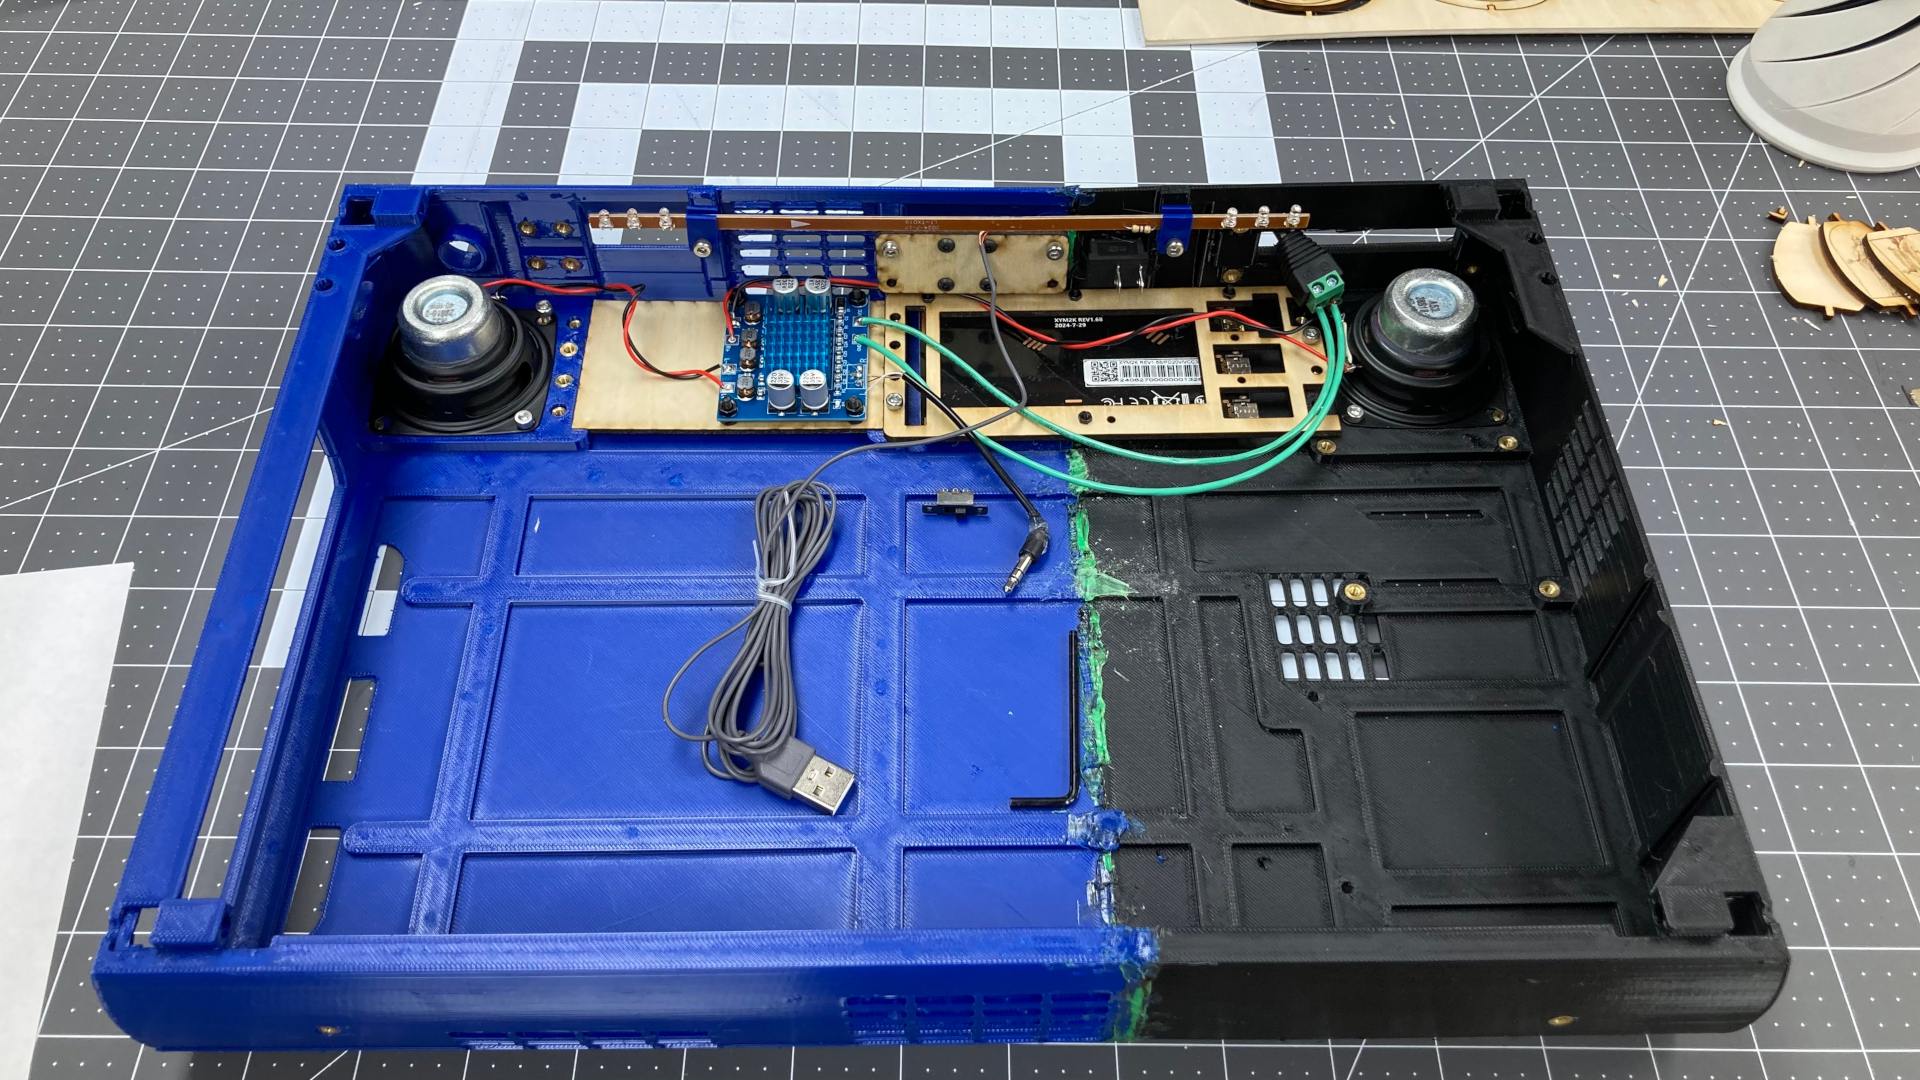
Electronics
This was probably the most challenging part of this build. Not so much getting them working, but getting them all wired up in a tight space. Fortunately, some connections could be achieved without soldering as common cables like usb and hdmi could be used. But in many cases I had to solder to contact pads on the various pcbs directly to save space. I also had to solder some power switches in line with some of the power connections. Here is a diagram of the wiring. Connections requiring power switches are marked with a power symbol.
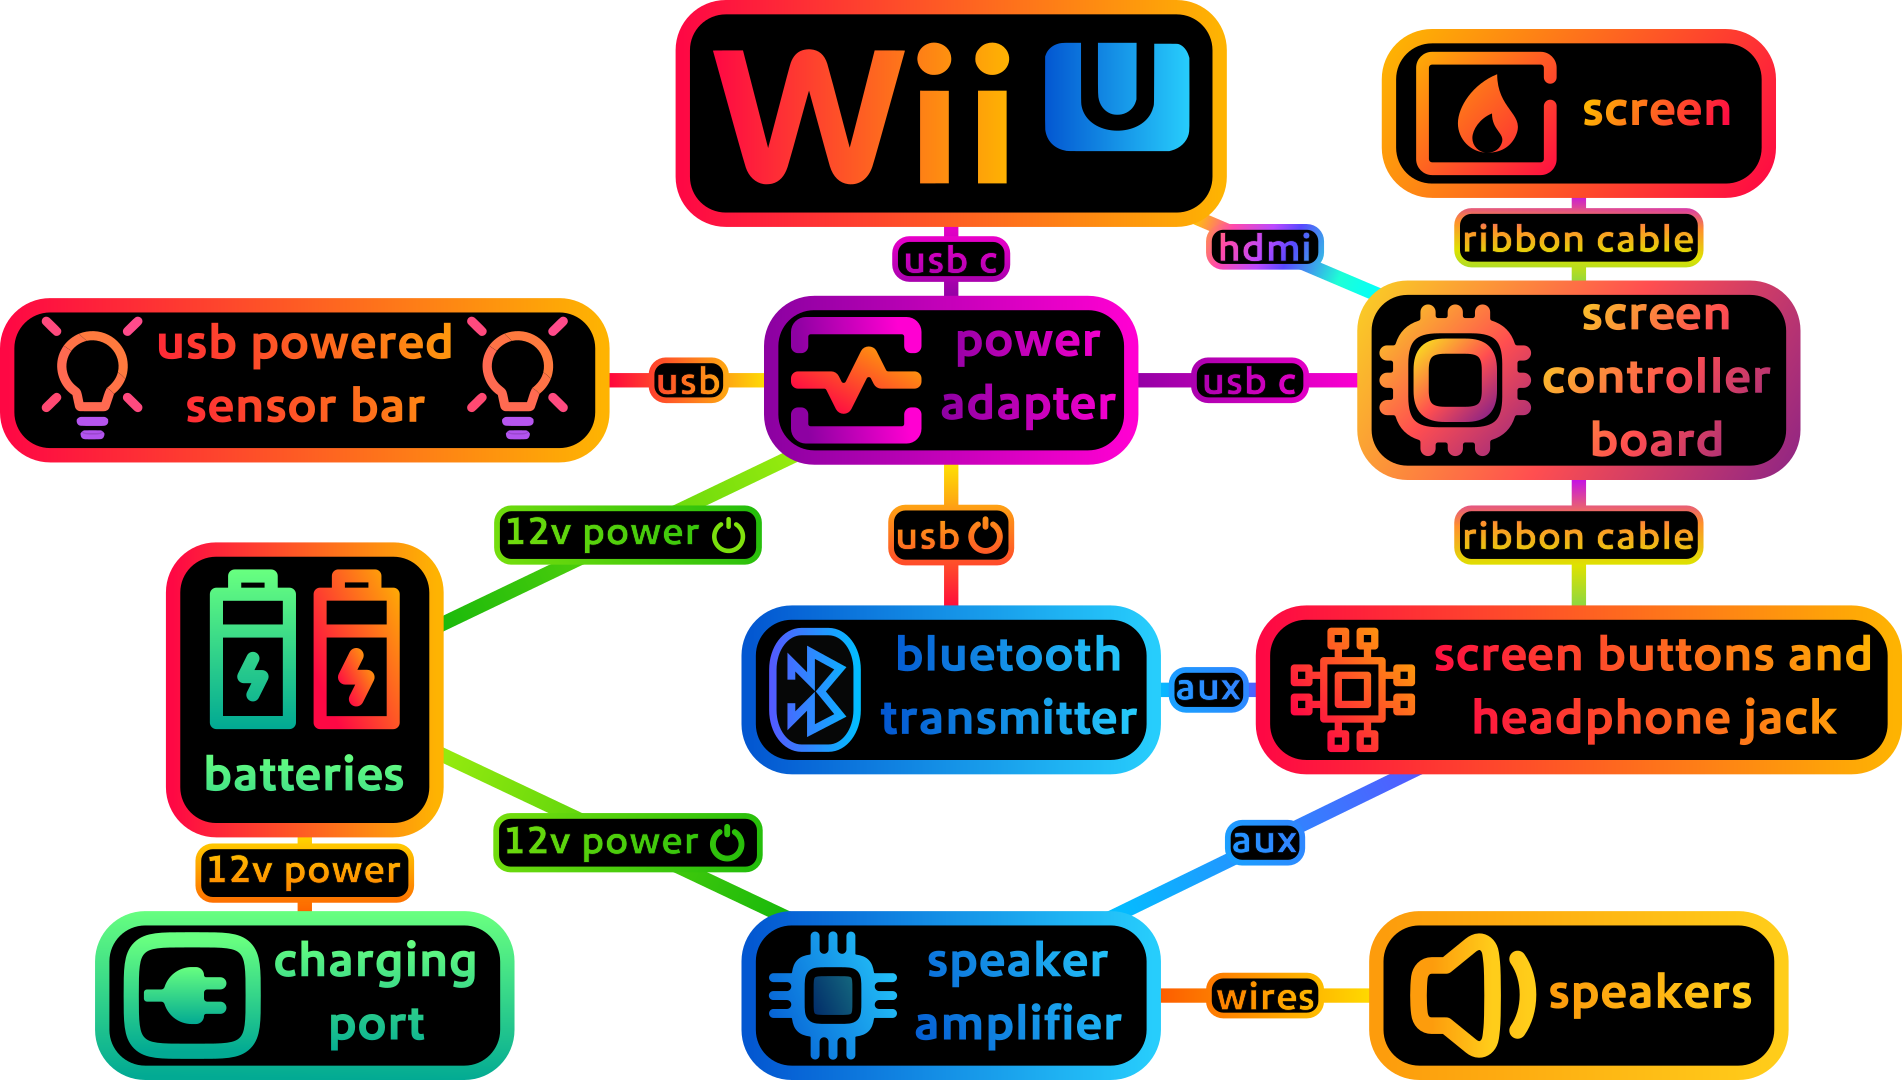
Also note that the batteries themselves have a power switch, which usually needs to be in the on position for them to charge. While not shown in this wiring diagram, I soldered on the contacts for the existing switch on the battery and ran wires to a switch mounted to the outside wall of the case.
Before I get too carried away, here is a mostly complete parts list with links:
Bill Of Materials:
| 12V power bank | amazon.com/dp/B00MF70BPU | I used two of these batteries which may be a little overkill, But I won’t complain about the extra battery life. |
| 2IN 4ohm 10W speaker | amazon.com/dp/B0CH8BH817 | you can probably use better speakers, just make sure they fit and are similar power rating |
| angled HDMI ribbon cable adapter (not full cable) | amazon.com/dp/B0C6MFXFMQ | swap out the hdmi male on the other ribbon hdmi cable for this as this is the only connector that will fit |
| Bluetooth transmitter | amazon.com/dp/B08DRMS57Y | theres probably other generic ones that work, they just may not mount perfectly like this one. It mounts with m2 screws, or you can glue it honestly |
| car usbc pd plug | amazon.com/dp/B0D6BCR3GT | I highly doubt that this actually can support 175 watts but any sort of plug that takes a dc input, has 2 usb c, 1 usb a, and can output 15v on one of the usb c ports will work. Some can only do step down, this is one of the few that can actually step up voltage as well |
| flat usb c | amazon.com/dp/B0D2CW5ST6 | probably other options can be used, this just happens to be one of the smallest usb c cables I can find |
| hdmi ribbon cable | amazon.com/dp/B0132IFKQU | the full size hdmi male needs to be replaced with an angled hdmi (also in BOM) Unfortunately I can’t find a cable that has both HDMI connectors needed. |
| longer ribbon cable for lcd display | amazon.com/dp/B09C2FTKGG | I purchased the 400mm variant, probably can also purchase from any generic seller |
| Portable monitor | amazon.com/dp/B0DCYBR34X | case is designed for this specific model, so other models may not fit. I purchased the “15.6in 1080p” model |
| Speaker amp | amazon.com/dp/B09Z6SQLDD | any generic amp will work as long as it can handle more than 20 w. |
| usb c pd trigger dummy | amazon.com/dp/B0BCW2LQP8 | This or a barrel jack connector can be used as a charging port for the batteries. Just make sure it is set to 12v. |
| USB C to Wii U | amazon.com/dp/B0CGN35FFB | many other similar products that will work on amazon, also can be found on ebay |
| usb powered Wii sensor bar | amazon.com/dp/B09X9SRW72 | There are lots of sellers for these and they should also work |
| Wii U | ebay, your basement, etc. | da best Nintendo |
Recommended tools
- Soldering Iron + Solder
- hot glue
- electric drill
- allen wrenches
- sandpaper
- 3D printer
- wire cutters/strippers
- 3D printer clippers
Extra Items/Quality of Life Improvements
These are some optional items I purchased for this project as well
| Item | link/source | notes |
| 256 GB sd card | amazon.com/dp/B07P4HBRMV | Needed for homebrew, and I would highly recommend doing so (see section below). You will need one for the sd card slot and another as a usb drive stuck in the back of the Wii U with the adapter listed below |
| Wii U gamepad battery replacement | amazon.com/dp/B0DPG1KTFH | The Wii U is quite old now, and my Wii U gamepad battery life was almost non-existent until I used this replacement. Its very easy to replace and includes a screwdriver |
| Micro SD card reader | amazon.com/dp/B07HFQQ71F | smallest SD card adapter I can find. A very easy solution for a usb storage device for homebrew that will fit inside of the portable Wii U case |
| USB gamepad charger | amazon.com/dp/B07GWBCJ92 | Ninendo decided the gamepad should use a proprietary connector even though the charger has the same power specs as a given usb port. Definitely nice to have as the regular charger is quite bulky |
Homebrew (optional but highly recommended)
Disc based consoles like the Wii U were never intended to be portable, and moving around the console while it is reading a disc can sometimes damage the reader and/or disc. For this reason, I would recommend using homebrew to mod your Wii U so it can load games off of an SD card instead using software like Wii Flow or WUP Installer. Homebrew also makes it possible to easily emulate older consoles like the Nintendo 64, or install popular mods for Wii and Wii U games. Additionally, the Wii U is able to run Nintendo Gamecube games natively without emulation because it contains all the hardware necessary except for the disc drive and controller ports, which can be emulated with Nintendont.
For homebrew, you will likely need two SD cards. One for the SD card slot, and another to act as a usb device inserted into the back usb ports of the Wii U. Usually it is recommended to use a usb hard drive or ssd, but I use an sd card to save space. Why two SD cards? One is needed for the Wii U, and the other is needed for the virtual Wii.
To get started, visit wiiu.hacks.guide to install aroma firmware. This site has many good tutorials for installing various homebrew softwares. There are also many helpful discord servers, but I am unable to find any invite links for them.